1. 들어가며
참고: 1~2주차는 Python 기반 코드 실습을 중심으로 기본기를 다지고, 3주차부터 Make와 같은 노코드 툴을 본격적으로 활용합니다. 따라서 이번 글에서는 “코드 실습”을 중심으로 하되, 뒤에서 이어질 노코드 활용 흐름까지 연결되는 기반을 마련합니다.
2. 자동화의 필요성과 ROI 분석
- ROI(Return on Investment) : 자동화가 가져올 투자 대비 효과를 수치로 확인할 수 있습니다.
- 단순 작업에 소요되는 시간을 전략적 활동에 재배치할 수 있어 조직 생산성이 크게 향상됩니다.
3. 노코드 생태계 비교
- Make

- 자유도가 높고, 시각적인 워크플로우 설계에 강점이 있습니다.
- 다양한 API와 모듈을 연결해 복잡한 시나리오도 직관적으로 구현할 수 있습니다.
- Zapier
- 빠르게 간단한 연결을 만들 수 있어 입문자에게 유리합니다.
- 하지만 복잡한 로직 구현에는 제약이 있습니다.
- Power Automate
- Microsoft 365 및 Teams 등 MS 생태계와 밀접하게 통합되어, 기업 환경에서 강점을 가집니다.
이번 과정에서는 Make를 중심으로 실습을 진행합니다. 다만 1~2주차에서는 Python을 통한 코드 실습으로 API 호출과 자동화의 원리를 이해하고, 3주차부터 Make 활용 실습을 본격적으로 진행하여 코드와 노코드 방식을 모두 체험할 수 있도록 구성되어 있습니다.
- 노코드 자동화 도구에는 대표적으로 Make, Zapier, Power Automate가 있습니다.
- 업무 자동화는 반복되는 단순 작업을 줄이고 효율을 극대화합니다.
- 이번 글은 Make 노코드 & AI 자동화 전문가 과정의 첫 번째 실습 시리즈입니다.
1주차에서는 자동화의 필요성과 ROI 분석, 노코드 생태계 비교, Make 기본 모듈 실습을 진행합니다.
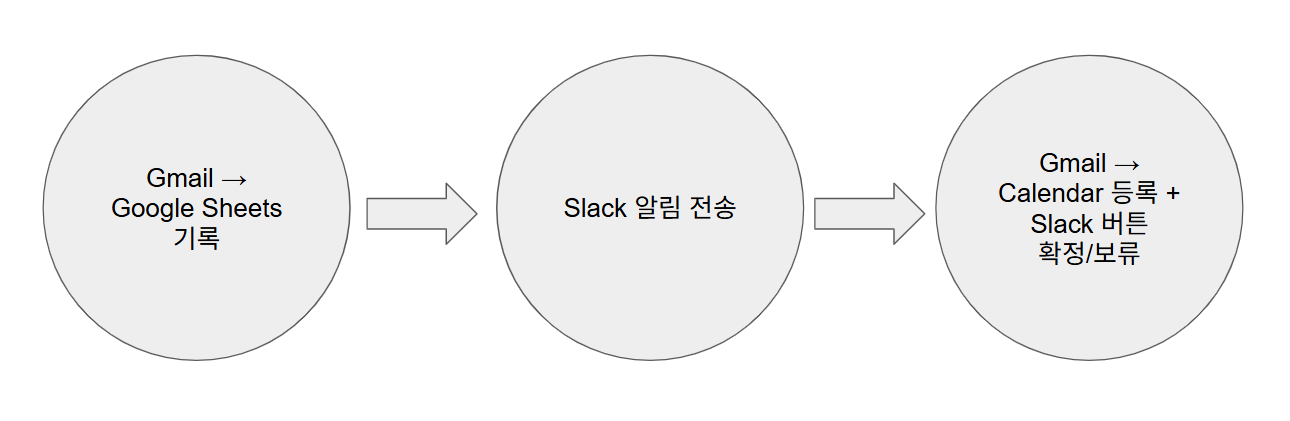
또한 Gmail → Google Sheets 기록 및 Slack 알림 자동화를 직접 구현하고, 확장 학습으로 Google Calendar API와 Slack 인터랙티브 메시지까지 실습합니다.
4. 실행 환경 및 준비 사항
실행 환경
아래 환경 중 어디서든 Python만 설치되어 있으면 실행 가능합니다.
- IDLE
- VS Code / PyCharm 같은 IDE
- 터미널 또는 명령 프롬프트에서 python 파일명.py 실행
- Jupyter Notebook / Google Colab
준비 사항
- Python 라이브러리 설치(smtplib은 Python 기본 내장 라이브러리라 설치 불필요)
-
pip install gspread oauth2client requests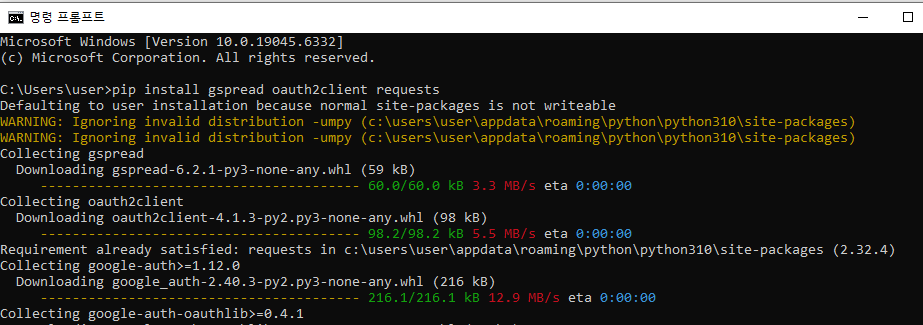
- Google API 인증 JSON
- Google Cloud Console에서 서비스 계정을 생성하고 JSON 키 다운로드(https://console.cloud.google.com/ )
- 코드에서 CREDENTIALS_FILE 경로에 맞게 저장
- Google Sheets에서 서비스 계정 이메일을 공유 권한 "편집자"로 추가Google Sheets 준비
- 자세한 생성 및 권한 부여 방법은 여기 튜토리얼을 참고하세요.
- heets-automation-test 라는 이름의 스프레드시트를 미리 생성
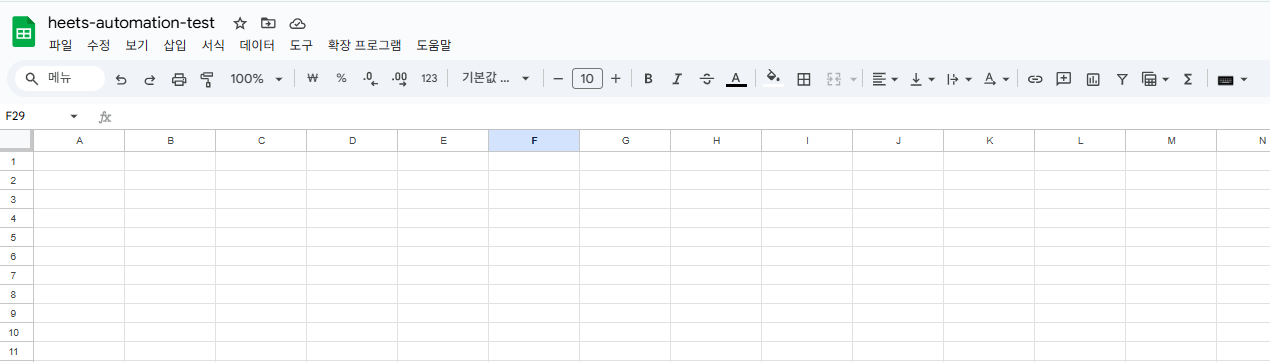
- Google Cloud Console에서 서비스 계정을 생성하고 JSON 키 다운로드(https://console.cloud.google.com/ )
- Slack Webhook URL
- Slack 워크스페이스에서 Incoming Webhooks 앱을 활성화
- 발급받은 URL을 코드의 SLACK_WEBHOOK_URL에 붙여넣기
- 설정 과정은 이 튜토리얼을 참고하세요.
5. 기본 실습: Gmail → Google Sheets 기록 + Slack 알림
# ---------------------------------------------------------
# Gmail → Google Sheets 기록 + Slack 알림 보내기 예제
# ---------------------------------------------------------
# 이 코드는 Gmail 데이터를 구글 시트에 저장하고,
# 동시에 Slack 채널로 알림을 전송하는 기본 자동화 흐름을 보여줍니다.
# 실제 Gmail API 연동 대신 예시 데이터를 사용합니다.
# ---------------------------------------------------------

import requests
import gspread
from oauth2client.service_account import ServiceAccountCredentials

# -------------------------------
# 1. Google Sheets 인증
# -------------------------------
# - 구글 클라우드 콘솔에서 발급받은 서비스 계정 JSON 키 파일 사용
# - gspread + oauth2client 라이브러리를 이용해 인증 수행
# - 인증 후, 지정한 시트("Sheets-automation-test")에 접근 가능
CREDENTIALS_FILE = "google_credentials.json"   # 서비스 계정 JSON 키 파일 경로
scope = ["https://spreadsheets.google.com/feeds",  # Google Sheets API
         "https://www.googleapis.com/auth/drive"]  # Google Drive API
creds = ServiceAccountCredentials.from_json_keyfile_name(CREDENTIALS_FILE, scope)
client = gspread.authorize(creds)             # 인증 객체 생성
sheet = client.open("Sheets-automation-test").sheet1    # "Sheets-automation-test"라는 시트 열기 (첫 번째 시트)

# -------------------------------
# 2. Gmail 데이터 예시
# -------------------------------
# - 실제 Gmail API에서 데이터를 가져올 수도 있음
# - 여기서는 예시로 메일 데이터(보낸사람, 제목, 날짜)를 딕셔너리로 작성
# - sheet.append_row() 함수를 사용해 한 행(row)으로 추가
gmail_data = {
    "from": "user@example.com",          # 보낸사람
    "subject": "자동화 테스트 메일",        # 메일 제목
    "date": "2025-09-22"                 # 메일 수신 날짜
}
sheet.append_row([gmail_data["from"], gmail_data["subject"], gmail_data["date"]])

# -------------------------------
# 3. Slack 알림 보내기
# -------------------------------
# - Slack 워크스페이스에서 Incoming Webhook 앱을 활성화 후 URL 발급
# - 발급받은 Webhook URL을 SLACK_WEBHOOK_URL 변수에 넣음
# - requests.post()로 JSON 메시지를 전송하면 지정 채널에 메시지가 뜸
SLACK_WEBHOOK_URL = "https://hooks.slack.com/services/XXXX/YYYY/ZZZZ"  # 실제 발급받은 Webhook URL로 교체
slack_message = {
    "text": f"📩 새 이메일 수신!\n보낸사람: {gmail_data['from']}\n제목: {gmail_data['subject']}"
}
response = requests.post(SLACK_WEBHOOK_URL, json=slack_message)

# -------------------------------
# 4. Slack 응답 확인
# -------------------------------
# - 상태 코드 200이면 성공적으로 전송된 것
# - 실패 시 에러 메시지를 출력해 디버깅 가능
if response.status_code == 200:
    print("Slack 알림 전송 성공")
else:
    print("Slack 알림 실패:", response.text)
실행 방법 & 결과 확인
1. 폴더 구성
코드 실행 전에 폴더 안에 필요한 파일을 준비해야 합니다.
예시 폴더 구조는 아래와 같습니다:
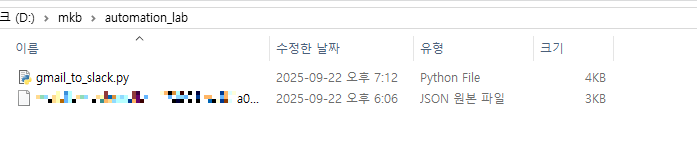
2. 실행 방법
- 터미널(명령 프롬프트, PowerShell) 또는 VS Code 터미널 열기
- 코드 파일이 있는 폴더로 이동
-
cd D:\mkb\automation_lab

- 파이썬 실행
-
python gmail_to_slack.py

3. 실행 후 동작
- Google Sheets
지정한 시트(Sheets-automation-test)에 새로운 행이 자동으로 추가됩니다.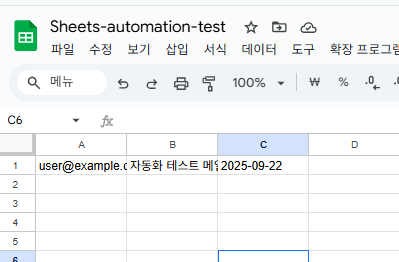
user@example.com | 자동화 테스트 메일 | 2025-09-22 - Slack 채널
Webhook URL과 연결된 채널에 다음과 같은 메시지가 표시됩니다. -
새 이메일 수신! 보낸사람: user@example.com 제목: 자동화 테스트 메일
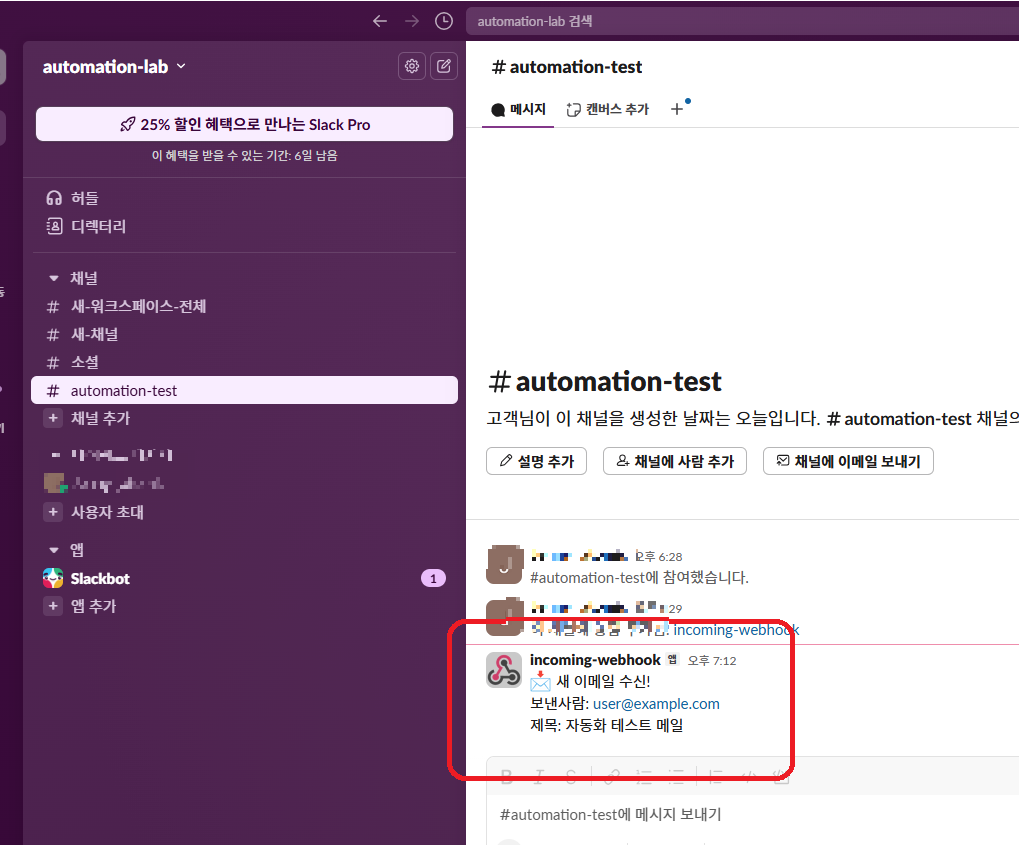
- 터미널 출력
정상적으로 전송되면실패할 경우에는 에러 메시지가 출력됩니다. -
Slack 알림 전송 성공

4. 주의사항
- JSON 키 파일 이름과 경로가 코드와 정확히 일치해야 합니다.
- Google Sheets 문서에 서비스 계정 이메일을 편집자 권한으로 공유해야 합니다.
- Slack Webhook URL은 외부에 공유하면 안 됩니다. (보안상 중요한 키)
6. 확장 학습: Gmail → Google Calendar 일정 등록 + Slack 버튼 알림
이 실습은 이전에 정리한 **[Gmail·Google Calendar OAuth 인증 & Slack 버튼 Interactivity 설정 가이드](https://jemoon222.tistory.com/79)** 를 기반으로 합니다.
> 아직 OAuth 인증이나 Slack 버튼 설정을 완료하지 않았다면 위 가이드를 먼저 확인해주세요.
캘린더용 인증 스크립트 만들기
make_calendar_token.py
from google_auth_oauthlib.flow import InstalledAppFlow
from google.auth.transport.requests import Request
from google.oauth2.credentials import Credentials
import os

SCOPES = ["https://www.googleapis.com/auth/calendar"]

def main():
    creds = None
    if os.path.exists("calendar_token.json"):
        creds = Credentials.from_authorized_user_file("calendar_token.json", SCOPES)
    if not creds or not creds.valid:
        if creds and creds.expired and creds.refresh_token:
            creds.refresh(Request())
        else:
            flow = InstalledAppFlow.from_client_secrets_file("credentials.json", SCOPES)
            creds = flow.run_local_server(port=0)
        with open("calendar_token.json", "w") as token:
            token.write(creds.to_json())
    print("✅ Calendar 인증 완료: calendar_token.json 생성됨")

if __name__ == "__main__":
    main()
여기서 credentials.json은 Google Cloud Console에서 다운받은 OAuth 클라이언트 키예요. (Gmail 인증 때 썼던 그 파일)
python make_calendar_token.py
브라우저가 열리고 구글 로그인 + 권한 허용 창이 떠요.
캘린더 접근 권한 허용하면 calendar_token.json이 같은 폴더에 자동 생성됩니다.


1. CMD 에서 라이브러리 설치
pip install google-api-python-client google-auth google-auth-oauthlib google-auth-httplib2
2. 캘린더용 인증 스크립트 만들기
- Google Calendar API도 OAuth 인증 후 **별도의 토큰 파일(calendar_token.json)**이 필요해요.
- 이 파일은 직접 만들어지는 게 아니라 최초 한 번 인증 과정을 거쳐야 자동 생성돼요.
gmail_calendar_slack.py
import requests
from googleapiclient.discovery import build
from google.oauth2.credentials import Credentials

# 1. Gmail API - 메일 읽기
creds = Credentials.from_authorized_user_file("token.json", ["https://www.googleapis.com/auth/gmail.readonly"])
service = build("gmail", "v1", credentials=creds)
results = service.users().messages().list(userId="me", maxResults=1).execute()
messages = results.get("messages", [])

if not messages:
    print("메일이 없습니다.")
else:
    msg = service.users().messages().get(userId="me", id=messages[0]["id"]).execute()
    headers = msg["payload"]["headers"]
    subject = next(h["value"] for h in headers if h["name"] == "Subject")
    sender = next(h["value"] for h in headers if h["name"] == "From")

# 2. Google Calendar API - 일정 등록
cal_creds = Credentials.from_authorized_user_file("calendar_token.json", ["https://www.googleapis.com/auth/calendar"])
calendar_service = build("calendar", "v3", credentials=cal_creds)
event = {
    "summary": f"메일 확인 필요: {subject}",
    "description": f"보낸사람: {sender}",
    "start": {"dateTime": "2025-09-23T10:00:00", "timeZone": "Asia/Seoul"},
    "end": {"dateTime": "2025-09-23T11:00:00", "timeZone": "Asia/Seoul"}
}
created_event = calendar_service.events().insert(calendarId="primary", body=event).execute()
print(f"일정 등록 완료: {created_event.get('htmlLink')}")

# 3. Slack 인터랙티브 버튼 알림
SLACK_WEBHOOK_URL = "https://hooks.slack.com/services/XXXX/YYYY/ZZZZ"
slack_message = {
    "text": f"새 메일 '{subject}'을 확인했습니다. 캘린더 일정이 생성되었습니다.",
    "attachments": [
        {
            "text": "후속 조치를 선택하세요:",
            "fallback": "버튼 선택 불가",
            "callback_id": "email_followup",
            "color": "#3AA3E3",
            "actions": [
                {"name": "confirm", "text": "일정 확정", "type": "button", "value": "confirm"},
                {"name": "later", "text": "나중에", "type": "button", "value": "later"}
            ]
        }
    ]
}
response = requests.post(SLACK_WEBHOOK_URL, json=slack_message)
if response.status_code == 200:
    print("Slack 버튼 알림 전송 성공")
else:
    print("Slack 알림 실패:", response.text)
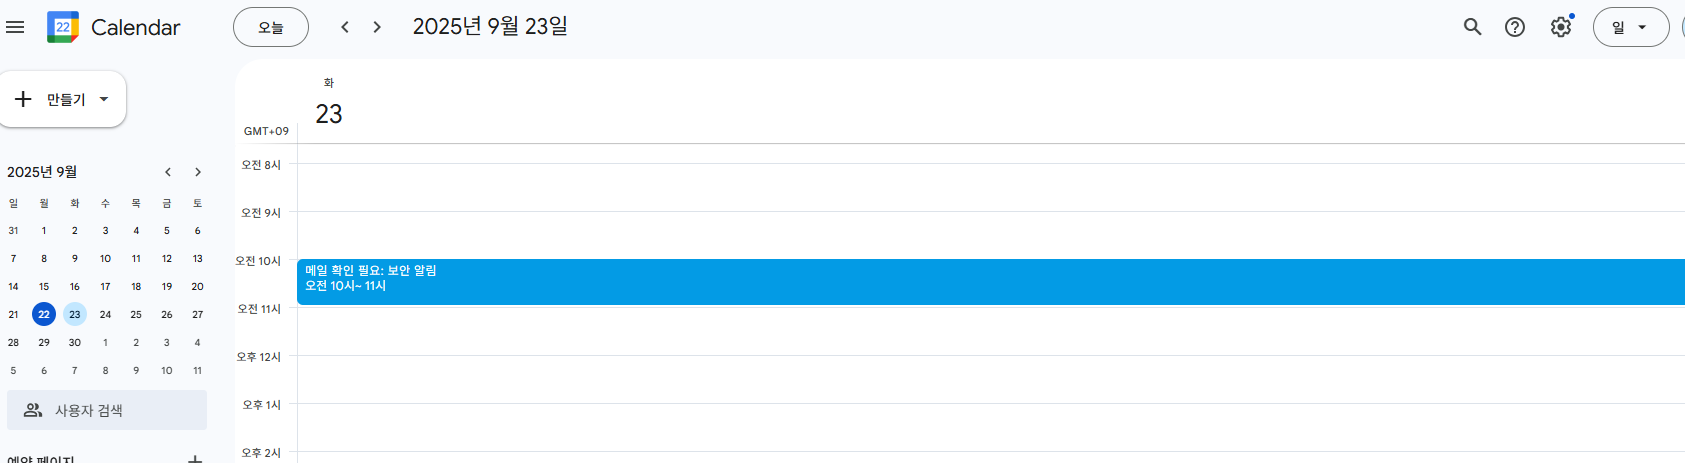
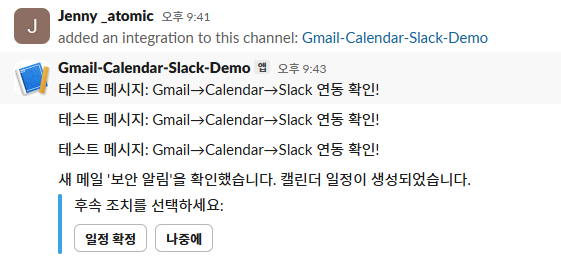
7. 실행 흐름 설명
- Gmail API로 메일을 불러오고, 제목과 보낸사람을 파싱
- Google Calendar API를 통해 일정 자동 생성
- Slack에 버튼이 포함된 인터랙티브 메시지를 전송해 사용자가 후속 조치를 선택 가능

8. Mini Project 제안
- 메일이 도착하면 → 캘린더 일정 자동 생성 → Slack으로 알림 발송
- 버튼을 눌러 일정 확정 여부를 바로 반영
1) worker.py — Gmail 최신 메일 → Google Calendar 일정 생성 → Slack 버튼 메시지
# worker.py
import os, json, requests
from datetime import datetime, timedelta
from googleapiclient.discovery import build
from google.oauth2.credentials import Credentials

# 기존에 생성해 둔 token.json 재사용 (Gmail 읽기 + Calendar 쓰기 스코프 동의가 포함된 것)
SCOPES = [
    "https://www.googleapis.com/auth/gmail.readonly",
    "https://www.googleapis.com/auth/calendar",
]
creds = Credentials.from_authorized_user_file("token.json", SCOPES)

gmail = build("gmail", "v1", credentials=creds)
calendar = build("calendar", "v3", credentials=creds)

# 기존에 발급받은 Webhook URL 그대로 사용
SLACK_WEBHOOK_URL = "https://hooks.slack.com/services/XXXX/YYYY/ZZZZ"

def get_latest_message():
    res = gmail.users().messages().list(userId="me", maxResults=1).execute()
    msgs = res.get("messages", [])
    if not msgs:
        return None
    msg = gmail.users().messages().get(userId="me", id=msgs[0]["id"]).execute()
    headers = msg["payload"]["headers"]
    subject = next(h["value"] for h in headers if h["name"] == "Subject")
    sender  = next(h["value"] for h in headers if h["name"] == "From")
    return {"id": msgs[0]["id"], "subject": subject, "sender": sender}

def create_calendar_event(subject, sender):
    # 지금 시각 기준 +60분 시작, 60분짜리 일정
    start = datetime.now() + timedelta(minutes=60)
    end   = start + timedelta(minutes=60)

    event = {
        "summary": f"메일 확인 필요: {subject}",
        "description": f"보낸사람: {sender}",
        "start": {"dateTime": start.strftime("%Y-%m-%dT%H:%M:%S"), "timeZone": "Asia/Seoul"},
        "end":   {"dateTime": end.strftime("%Y-%m-%dT%H:%M:%S"),   "timeZone": "Asia/Seoul"},
    }
    created = calendar.events().insert(calendarId="primary", body=event).execute()
    return created["id"], created.get("htmlLink")

def post_slack_with_buttons(subject, sender, event_id, event_link):
    # 버튼 value에 eventId와 action을 JSON으로 넣어 app.py에서 그대로 파싱
    payload = {
        "text": f"새 메일을 확인했습니다.\n제목: {subject}\n보낸사람: {sender}\n캘린더: {event_link}",
        "attachments": [
            {
                "text": "후속 조치를 선택하세요:",
                "callback_id": "email_followup",
                "color": "#3AA3E3",
                "actions": [
                    {"name": "confirm", "text": "일정 확정", "type": "button",
                     "value": json.dumps({"action":"confirm","eventId":event_id})},
                    {"name": "later",   "text": "나중에",   "type": "button",
                     "value": json.dumps({"action":"later","eventId":event_id})},
                ],
            }
        ],
    }
    r = requests.post(SLACK_WEBHOOK_URL, json=payload, timeout=10)
    r.raise_for_status()

if __name__ == "__main__":
    msg = get_latest_message()
    if not msg:
        print("새 메일이 없습니다.")
    else:
        ev_id, ev_link = create_calendar_event(msg["subject"], msg["sender"])
        post_slack_with_buttons(msg["subject"], msg["sender"], ev_id, ev_link)
        print("Mini Project 완료")
포인트
- token.json은 기존 것을 그대로 사용한다.
- 일정 시간대는 Asia/Seoul로 고정. 필요하면 규칙만 바꾸면 된다.
- Slack 버튼 포맷은 attachments(레거시) 기준. Block Kit로 교체 가능.
2) app.py — Slack 버튼 클릭 수신 → Calendar 이벤트 업데이트
# app.py
from flask import Flask, request, make_response
from googleapiclient.discovery import build
from google.oauth2.credentials import Credentials
import json

app = Flask(__name__)

# 기존 token.json 재사용 (calendar 권한 포함)
SCOPES = ["https://www.googleapis.com/auth/calendar"]
creds = Credentials.from_authorized_user_file("token.json", SCOPES)
calendar = build("calendar", "v3", credentials=creds)

@app.route("/slack/actions", methods=["POST"])
def slack_actions():
    # Slack Interactivity에서 전달하는 form-encoded payload
    payload = json.loads(request.form.get("payload", "{}"))
    actions = payload.get("actions", [])
    if not actions:
        return make_response("No action", 200)

    data = json.loads(actions[0]["value"])   # {"action":"confirm"|"later","eventId":"..."}
    action, event_id = data["action"], data["eventId"]

    ev = calendar.events().get(calendarId="primary", eventId=event_id).execute()

    if action == "confirm":
        # 제목에 [확정] 접두어 추가
        summary = ev.get("summary", "")
        if not summary.startswith("[확정] "):
            ev["summary"] = f"[확정] {summary}"
        calendar.events().update(calendarId="primary", eventId=event_id, body=ev).execute()
        return make_response("일정이 확정 처리되었습니다.", 200)

    if action == "later":
        # 설명에 메모 추가(원하면 시간 미루기 로직으로 교체 가능)
        desc = ev.get("description", "") or ""
        if "후속 처리: 나중에" not in desc:
            ev["description"] = (desc + "\n후속 처리: 나중에").strip()
        calendar.events().update(calendarId="primary", eventId=event_id, body=ev).execute()
        return make_response("일정이 '나중에'로 표시되었습니다.", 200)

    return make_response("Unknown action", 200)

if __name__ == "__main__":
    # 이미 Slack App > Interactivity에 등록해 둔 Request URL 그대로 사용
    # ngrok 주소가 바뀌었으면 Slack 설정에서 URL만 업데이트
    app.run(host="0.0.0.0", port=8000)
포인트
- Interactivity Request URL은 기존에 등록한 엔드포인트 그대로 사용.
- ngrok 무료 플랜은 주소가 바뀌므로 재시작 시 Slack 설정에서 URL만 갱신.
- 확정/나중에 로직은 단순 예시라, 실제로는 “시간 미루기(+3시간, +1일)” 등으로 확장 가능.
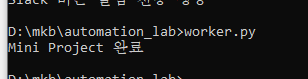
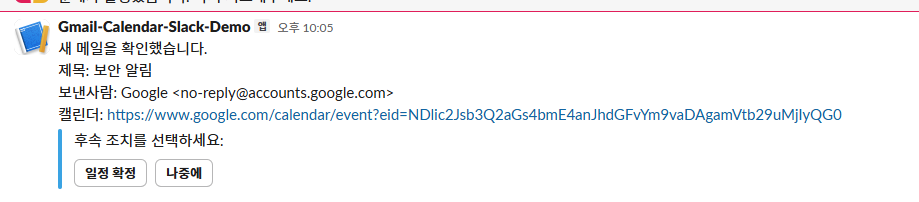
3) 실행 흐름(요약)
- python app.py 실행(서버는 계속 띄워둠).
- ngrok 주소가 바뀌었다면 Slack Interactivity URL만 새 주소로 갱신.
- python worker.py 실행.
- Gmail 최신 메일을 읽어 Google Calendar에 일정 생성 → Slack으로 버튼 포함 메시지 전송.
- Gmail 최신 메일을 읽어 Google Calendar에 일정 생성 → Slack으로 버튼 포함 메시지 전송.
- Slack에서 버튼 클릭 → app.py가 수신 → Calendar 이벤트 업데이트.

9. 마무리 & 다음 학습
이번 1주차 실습에서는 Make를 활용한 기본 자동화 시나리오를 Python 코드로도 체험했습니다.
다음 2주차에서는 데이터 처리와 조건문, 함수 활용을 통해 더 고급 자동화를 만들어봅니다
.
'Make 노코드 & AI 자동화 전문가 과정' 카테고리의 다른 글
| 2주차: 데이터 처리와 시나리오 설계 (0) | 2025.09.23 |
|---|---|
| Make 노코드 & AI 자동화 전문가 과정 시리즈 개요 (0) | 2025.09.22 |
| Gmail·Google Calendar OAuth 인증 & Slack 버튼 인터랙션 설정 가이드 (0) | 2025.09.22 |
| Slack Incoming Webhook 설정 및 Python으로 알림 보내기 튜토리얼 (0) | 2025.09.22 |
| Google Cloud Console에서 서비스 계정 생성하고 JSON 키 발급하기 (Python 연동용 가이드) (0) | 2025.09.22 |